


Pinball machines are highly sought after for those who enjoy reliving their childhood, and is an entertaining game to play as a new hobby. Proudly sponsored by Progressive Automations, Project Pintable by Loren Browman aims to combine modern aesthetics and form factor with a traditional pinball machine. By integrating some top linear actuators in his project, Loren made his very own DIY pinball machine in a coffee table that is comfortable to play while still being viable for home-use thanks to its compact size. If you were interested in making a pinball coffee table, this article is just for you! We will be covering the details and products used in Project Pintable to gain a better understanding on what it takes to make your very own custom pinball coffee table.
How the Pinball Coffee Table was Built
A few years ago, Loren decided he wanted to play pinball in his own home. However, he realized there was not enough space for a full-sized pinball machine. In 2018, Loren started noodling on the idea of possibly making a DIY pinball machine in a coffee table. As a part time hobby, Loren enjoys tinkering on the side and started his build of the custom pinball coffee table in June of 2020. After completing this project in December of 2021, we can now see the Pintable in action along with its build process!
Acquiring the Supplies and Design

1980’s Bally Centaur Pinball Machine
After acquiring a 1980’s Bally Centaur Pinball Machine from a local collector, Loren was able to practice the game in a semi-playable state. In doing so, he was able to learn the machine and let some of his ideas percolate. The existing components were then carefully modelled in Fusion360 with final dimensions of: 45”L x 22.5”W x 18”H.

Fusion360 model of the Pintable
Score Decoding
An alternative way of displaying the scores and current ball count was required since these were all displayed by the back box, which was removed to save space. Loren decided to go with a Tiny FPGA BX board and custom Verilog since FPGAs allows users to design their own chip using a Hardware Descriptive Language (HDL). A custom SPI core and decoder logic was written to read 16 signals simultaneously. A Teensy 4.1 microcontroller is then used to read the Binary Coded Decimal (BCD) for each display position asynchronously as the score gets updated.

Electronics Layout
A four-layer board was designed through KiCAD and arrived directly from a Chinese board house. This was part of the custom circuit board needed to reliably house all the electronic components. The electronic components were later hand soldered to the board and powered up in isolation to confirm the board had no issues.
Playfield Restoration
Even though the playfield was a clean reproduction, all the components came caked with dust, frayed wires, and lots of solder blobs. Everything was stripped down from the bottom to start from scratch and get a fresh coat of paint. A custom pinball rotisserie was also made for making the restoration process easier.

Playfield Restoration Process
The electrical connections were then resoldered and rerouted as needed. Nitro Pinball was able to supply replacement circuit boards, fresh white rubbers and a set of new pinballs. The drop targets found in rough shape were replaced with 3D printed ones which still incorporates the original font and was then coated with epoxy for durability and smoothing.
As a way of modernizing the Pintable, LED bulbs from Comet Pinball were used to replace the original incandescent bulbs. The new LED bulbs will not need as much maintenance in the long run and has a brighter glow while being more energy efficient.
Remaining parts from the original Pinball machine ended up being donated to a friend to help with their restoration of a Centaur Pinball Machine.

Remaining Centaur Pinball Machine parts being donated
Welding the Base
Construction of the base consists of welding 1/2″ x 1/2″ square mild steel tubing powder coated in gloss black. This base is then used to house two drawers made of brushed stainless-steel. The use of these drawers makes servicing and troubleshooting of the electronic boards more with the improved ease of access.

Cabinet with circuit boards on drawers
Adjustable Height Coffee Table
A lifting coffee table was required to get the desired incline while still being capable of adjusting to a flat surface for normal table use. Electric linear actuators provided the means of converting electrical power into linear push and pull motion for the lifting coffee table.

Adjustable height coffee table drawing
Inexpensive actuators from AliExpress were initially tested but later deemed unsuitable as they had grinding gears and still had a lot of play after being fully extended. To resolve this issue, Loren needed actuators which can offer sturdy built quality, compact size, and decent force ratings.
After reaching out to Progressive Automations, it was determined that two PA-09-4-330 actuators and four BRK-09 hinged mounting brackets were able to meet all the requirements.

PA-09 and BRK-09
These actuators with their 330 lbs force rating were more than able to handle the required 150 lbs load and is one of our most compact actuators. Although PA-09 actuators have a slower travel speed, this was not an issue since the travel distance was only 4 inches and it was not crucial for the lift to adjust at high speeds.

Adjustable height coffee table in action
Custom Apron
Large areas on the original apron had paint chips and was faded. A new custom apron was then made using 16-gauge steel. A water jet machine was used to cut the custom apron into the right pieces which later was bent into shape at a Metal Mart fabrication shop.
The custom apron was now ready for painting at a local auto body shop. Customrubontransfers.com supplied the high quality custom two-tone decals for this apron. The original artwork from the previous cabinet and apron were traced into vector files and later used.
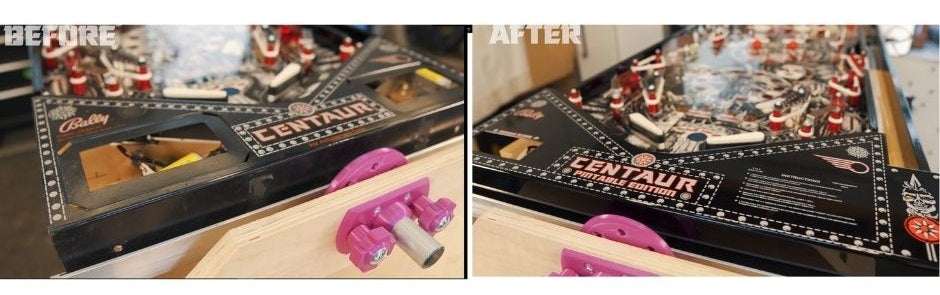
Pintable apron before and after
Cabinet Construction and Decals
The cabinet was constructed from Baltic Birch plywood which was laminated in gloss black Formica. The corners were made from stacked plywood that got milled into a custom profile and coated in epoxy. A channel was milled into the top edge of the cabinet to house a silicone gasket. The glass top was cut and polished by a local glass shop and rests on top of the cabinet. The combination of the glass top and silicone gasket helped to greatly reduce the noise level of the pinball coffee table.
To make the underside serviceable, the playfield was hinge inside the cabinet using newer style pivots that are found in Stern machines.
The existing ball plunger with its pointed tip had ended up being at knee-height and was later removed for user safety. A knocker solenoid was repurposed to shoot a metal rod at the cabinet’s side for notifying users that a free ball has been awarded. Once a ball is ready for launch, the Teensy microcontroller grabs the shared sound, and the solenoid data bus instructs the Solenoid driver board to activate the knocker solenoid. Now acting as a ball launcher, the knocker solenoid is located underneath the custom apron.
Wrap Guys supplied the custom vinyl transfer decals that were inspired by the original cabinet artwork. Chrome studs were then added as decoration to replicate its original looks which made use of stencilled studs.

Custom vinyl transfer decals
Taking Control
The Teensy microcontroller’s firmware allows for all the new features required for the Pintable such as:
- Reading the FPGA to fetch the updated score.
- Displaying scores onto the 3.83” OLED using the U8G2 library with a custom driver.
- Monitoring the accelerometer during lifting and lowering of the pintable.
- Controlling the linear actuators through the dual H-Bridge.
- Sensing for tilting and impact collisions through the accelerometer.
- Navigating the settings menu using a rotary encoder.
- Controlling the original shared data bus to trigger solenoids and sounds.
- Lighting the skull LEDs and monitoring the ball launch switch.
- Simulating switch presses for the original start button and tilt switch.
- Tetris mode control.
- Monitoring for game start condition.
- Displaying the splash screen after game initialization.
- Diagnostics modes to aid troubleshooting.
All these features were implemented as tasks and assigned to the task scheduler to keep clean and efficient code.

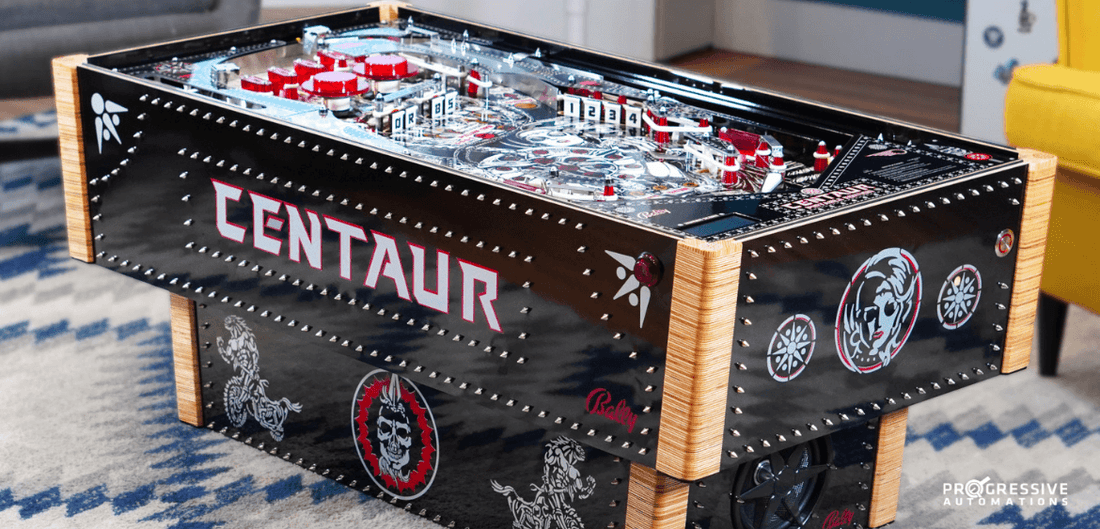
Pintable with all components on display
For more information on the Pintable, you can also reach out to Loren directly through his blog!
In Summary
By integrating the right equipment and supplies, Loren now has his very own custom pinball coffee table! The Pintable no longer accepts any coins and is on free play mode forever. Located in the living room of a very busy household with kids, dogs, and many visitors, all who enter are welcome to play!
For more projects by Loren, feel free to visit his Youtube channel! The PixelMask is another notable project of his that makes for a cool Halloween costume. After his short break over the holiday, Loren plans on making a standing desk with a custom top as his future project.
Thank you to Loren for sharing your project – we wish you and Project Pintable good luck in the Rockler Hobby Challenge!
If you have any custom projects, applications, or technical questions on our products, feel free to reach out to us anytime. We are experts in what we do and will be happy to assist you with your future custom projects!

sales@progressiveautomations.com

1-800-676-6123