


Whether you are at home, on a road trip or living a mobile lifestyle, the benefits of having a comfortable and luxurious interior is something that many of us sought after. This is because an ergonomic and pleasant environment has long-term positive impacts to our mood, posture, and mental health. In some cases, it may be challenging to enjoy these benefits when there is a limited amount of space to work with. For example, sleeping in a tiny house or sprinter van generally requires efficient use of the available space.
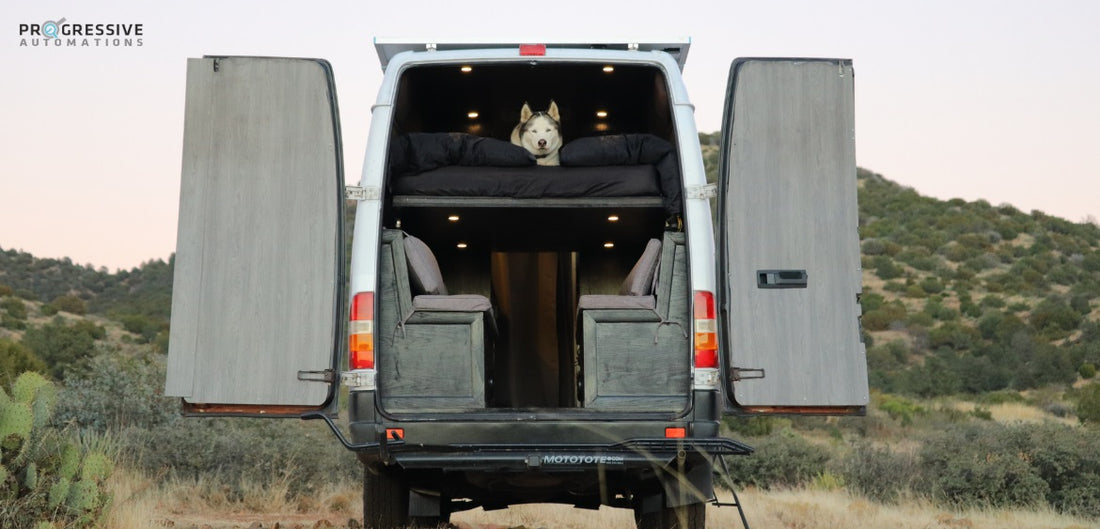
In this article, Michael Fiala demonstrates his version of a sprinter van adjustable bed that is raised and lowered to uncover his living room. It also gives his loyal companion plenty of comfortable space while on the road – his dog, Sox!
Proudly sponsored by Progressive Automations, we will cover the details and products used in Michael’s project to gain a basic understanding on how you can make your very own raisable bed!
How the Automated Bed Lift was Created
Michael’s idea to make a bed lift was inspired from his friend's RV that had a raisable bed which could lift all the way to the ceiling. After searching for his friend’s bed lift, he found the system was being sold for almost $3000 by the original company. In his research for alternative option that was more affordable, our FLTCON-4 control box caught his attention because of its ability to synchronize four linear actuators to travel the same speed. Michael estimates that his interior benches took 2-3 days, the bed took two days, and the installation of the actuators with mounting brackets took about 8-10 hours to complete. After completing this project in January of 2022, we can now see the sprinter van bed lift in action along with its build process!
Selecting the Suitable Actuator
Actuators with hall effect feedback were required for proper lift since the feedback goes to a control box which would then be able to make the needed corrections if one side travels at a different speed from the other. Differing speeds can sometimes happen from slightly unequal weight distribution or the speed tolerance from the DC motors (+/- 10%) in the actuators. The PA-04-30-400-HS-24VDC actuator was selected for this project since it has the physical dimensions which Michael was able to work with, and was the only off the shelf model we offer with hall effect feedback. Another benefit of this model is its 400 lbs force rating per actuator, which can easily lift the bed with confidence and peace of mind.

PA-04-HS
Mounting the Actuators Through the Benches
The primary material for the rear of the vehicle consisted of plywood cut into shape for the living room benches. Due to the unorthodox framing of a van interior, the project initially took many adjustments to get the system to work well inside of the van. The most challenging part of this project was securing all four actuators through the benches and making them physically parallel to each, however, careful double checking of the required measurements can help to reduce incorrect offsets.

Our BRK-01 mounting brackets were used to secure the rear actuator mounting holes into place.

Rear mounting holes secured into place
For extra stability and support, the top of the living room benches had cut-outs which were tightly fitted to the actuator’s shaft housing.

Secured PA-04-HS actuators through bench tops
Wiring and Controlling the Actuators
The FLTCON-4 control box was then wired with our AC-25 wire extenders to extend the wire length between each actuator and the control box. Although the FLTCON-4 could not operate on 12v directly, Michael had a generator to solve this issue. Installing 110v throughout the whole van was not preferred due to the energy expense of AC compared to DC. Michael used a solar generator from Bluetti which comes with a massive 2000watt inverter built within it. That solar generator is 170amp hours of lithium as a backup to his 500amp hour battery bank for powering everything else in the van. Our FLTCON-4 was then plugged into the solar generator and can be activated by turning on the inverter.

Control box wiring

Secured control box with wire extenders
The RT-11 remote compatible with our FLTCON-4 control box was then connected through a long wire extension with an RJ-45 connector at the end. This was so the remote control could be mounted at a distance onto a sliding drawer for convenient user access.

RT-11 remote installed
Sourcing a Bed for a Sprinter Van
When looking for a suitable bed for a car or a van, key factors to consider include choosing the proper size that is compact enough to fit the space constraints while still offering the needed amount of comfort to sleep well. If fuel efficiency was a concern, we recommend bed platforms and mattresses that were not too heavy while still offering sufficient durability and quality.
The custom van bed by Michael had a platform with 3/4” plywood on the bottom, a steel 1” square tubing frame with roughly 6-7 cross supports and then a 1/2” plywood on top of the metal frame. Carriage bolts were later used to sandwich the frame between the two layers of plywood.

Custom van bed platform

Custom van bed with mattress in place
Once the bed was completed, it was later mounted onto the top of the actuators using our BRK-01 mounting brackets.

Top mounting brackets secured into place
Sprinter Van Living Room Lighting
For the living room’s lighting, Michael had wired 12v puck lights in parallel under the bed. The positive and negative wires were hidden in a black sheath and secured to the actuator on the passenger side closest to the front of the van. The electrical wiring was then hooked up to a spring mechanism so that when the bed is lowered, the spring pulls the wire through the backrest to allow for a neat and tidy setup with no hanging wires. The final step of this build was the sanding and painting of the wooden surfaces to reveal the completed sprinter van bed lift!

Completed sprinter van bed lift
Issues: How They Arose and Were Overcome
The biggest problem encountered was that the original benches were built first and then needed to be installed with the actuators. This had resulted in the placement of the actuators not working with the initial amount of space provided. To overcome this issue, the benches were taken apart and had 3” spacers added to the rear of the bench to allow enough room for the actuators to fully extend toward the ceiling without hitting the curved walls.
If the same project could have been done again by Michael, he would get shorter actuators with 24-inch stroke instead of 30-inches. The current setup has 24 inches of head room when the bed is fully lowered. This is because he initially did not know the mounts on top and bottom would add as much height as he thought and since the actuators don’t lower to 0.0 and stop at 0.2-inch position. So instead of the bed sitting flush on the backrest it sits almost 6” above the backrest. This 6” could be used for extra headroom when laying in the bed.
In Summary
Michael was very happy with the straightforward installation of the actuators and now has his very own sprinter van bed lift! With his new sprinter van adjustable bed, Michael now has a luxurious interior that is comfortable to sleep in while also maximizing the van’s space efficiency.
Thank you to Michael for sharing your project! We hope you enjoy your time at the Van Build Expo while sharing the lift system with future van builders!
If you have any custom projects, applications, or technical questions on our products, feel free to reach out to us anytime! We are experts in what we do and will be happy to assist you with your future custom projects!
sales@progressiveautomations.com | 1-800-676-6123