


Electric connectors are used as a mechanical assembly to join electrical components together. They are widely used in electrical devices such as an electric linear actuator. It is common for users to install a new connector to wires or change connectors for an existing power cable. In this article, I will go over the tools needed, and the steps required to install a new connector for your linear actuator.
Components and Tools
- Wire.
- Connector terminal pin.
- Connector housing receptacle.
- Wire stripper.
- Wire crimper.
Instructions
Step 1. Finding the correct connector
There are many electrical connectors out there, finding the right one for your application is the first thing you want to do. When looking for the right connector for your applications there are a few things you want to consider:
- Type and style of the connector.
- Wire gauge of the connector.
- Male or female connector housing receptacle.
- Male or female connector terminal pin.
The majority of the information can be found from the actuator’s specification. For example, the PA-14 Mini Linear Actuator would only need a 20 AWG wire, Molex mini-fit Jr. connector housing and its corresponding terminal pins.
Step 2. Preparing the wire for assembly
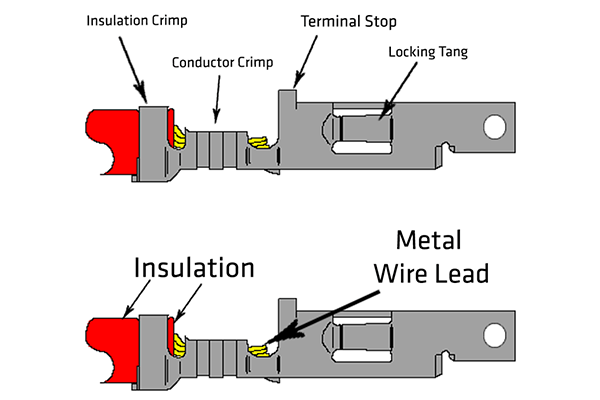
Once you have found all the correct components, take a linear actuator’s power wire, and using the wire stripper to strip away 5/8 inch of insulation. Try to fit into the connector terminal pin to make sure the insulation does not exceed the insulation crimp section, and the stripped wire lead stay within the conductor crimp section.
Step 3. Crimp the connector terminal pin to wire
Once you have correctly fitted the wire onto the terminal pin, take the wire crimper tool and choose the slot that is bested suited with your wire gauge. Rest the terminal pin in the slot so the conductor crimp section is in the crimper. Press down the handle, and the crimper will close on to the terminal pin and crimp the wire in place. Take care not to crimp on to the terminal stop. Next move the crimper tool to the insulation section, adjust the slot as needed, and press down the handle. Now the terminal pin is secured crimped onto the wire.
Step 4. Install the connector housing receptacle
Once you have crimped all the pins you needed to the wire leads, it is time to insert them into the connector housing receptacle. At this point it is a good idea to double-check your pin assignment is correct, once the pin is inserted, it will be difficult to switch them around. Follow the pin assignment to insert the pin terminal one by one, make sure they are sitting upward so the terminal stop is on top and the locking tang is on the sides. Push the pin terminal in until you hear a click sound, that is the locking tang snap in place which means the connector pin terminal is properly inserted. Now your electric linear actuator is ready to be installed in your application. The new connector allows for a plug and play functionality, and can be easier removed or replaced.
This is a general instruction on how to install connectors for an electric linear actuator. There are thousands of different connectors out there, and each of them provides a specific feature to your application. It might be a higher IP rating, allow larger wires or stronger tension. Choosing the right connector and install it correctly can help your project a long way. For more information on other instructional articles, please visit https://www.progressiveautomations.com/.