في دليل اليوم، سنستعرض كيفية معرفة مقدار القوة التي يطبقها مشغل خطي من خلال مراقبة مقدار التيار الذي يستهلكه. سيكون هذا أحد أدلتنا المتقدمة وسيستلزم بعض البرمجة المعقدة والمعايرة والإعداد. سنغطي مراقبة الإدخال التناظري وكيفية استخدام وظائفه. في هذا المشروع، سنستخدم MegaMoto Plus، ومشغلًا خطيًا (نستخدم مشغلنا الصغير PA-14 mini actuator)، وArduino Uno ومصدر طاقة بجهد لا يقل عن 12 فولت.

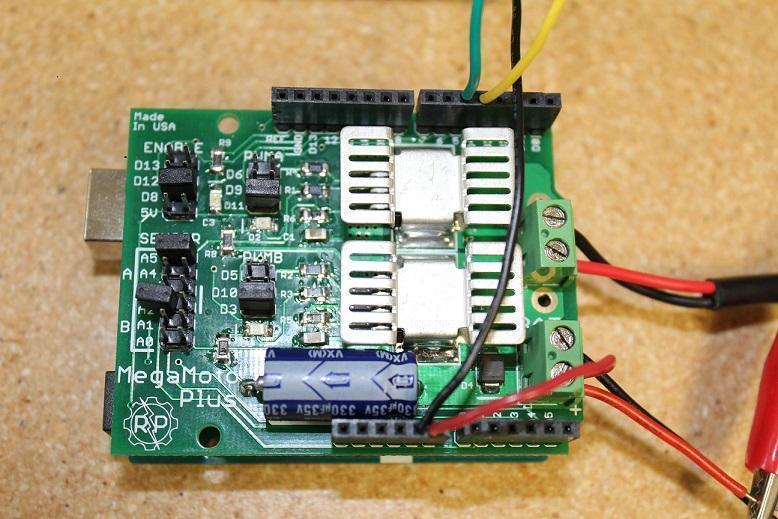
للبدء سنحتاج إلى تنفيذ التوصيلات لربط كل شيء معًا. ابدأ بتوصيل MegaMoto مع Arduino، فقط ضع MegaMoto أعلى Uno. ثم صِل سلكًا من طرف BAT+ الموجود على MegaMoto إلى طرف Vin الموجود على Uno.

الآن نحتاج إلى توصيل أسلاك المشغلات الخطية بأطراف A وB على MegaMoto وتوصيل مصدر طاقة 12V بـ BAT+ والأرضي GND بـ BAT-. سنحتاج أيضًا إلى توصيل زرين للتحكم، وذلك بوصل كل زر بين طرف غير مستخدم وGND. نوصي بتركيب الأزرار على لوحة تجارب (breadboard).

حان وقت بعض البرمجة على Arduino Uno. نريد برمجة الأزرار بحيث يمكنها التحكم في توقيت تمدد المشغل وتراجعه. ستبدأ مراقبة التيار بمجرد تمدد المشغل، وهذا سيسمح لنا بملاحظة ما إذا كان يتجاوز حد التيار الأقصى أم لا. إذا تجاوز الحد فسيتوقف المشغل تلقائيًا حتى تقرر سحبه للتراجع. وبما أن المحركات داخل المشغلات يحدث لديها ارتفاع كبير في التيار عند التشغيل لأول مرة، فستتضمن الشيفرة التي ندخلها تأخيرًا قصيرًا قبل أن تبدأ في مراقبة التيار. ستكون هذه الشيفرة قادرة على قراءة وصول المشغل إلى مفاتيح الحدّ، وذلك عندما ينخفض التيار إلى 0.
const int EnablePin = 8;
const int PWMPinA = 11;
const int PWMPinB = 3; // pins for Megamoto
const int buttonLeft = 4;
const int buttonRight = 5;//buttons to move the motor
const int CPin1 = A5;  // motor feedback

int leftlatch = LOW;
int rightlatch = LOW;//motor latches (used for code logic)
int hitLimits = 0;//start at 0
int hitLimitsmax = 10;//values to know if travel limits were reached

longlastfeedbacktime = 0; // must be long, else it overflows
int firstfeedbacktimedelay = 750; //first delay to ignore current spik
int feedbacktimedelay = 50; //delay between feedback cycles, how often you want the motor to be checked
currentTimefeedback = 0; // must be long, else it overflows
unceTime = 300; //amount to debounce buttons, lower values makes the buttons more sensitivelong lastButtonpress = 0; // timer for debouncing
long currentTimedebounce = 0;
int CRaw = 0;      // input value for current readings
int maxAmps = 0; // trip limit
bool dontExtend = false;
bool firstRun = true;
bool fullyRetracted = false;//program logic

void setup()
{
  Serial.begin(9600);
  pinMode(EnablePin, OUTPUT);
  pinMode(PWMPinA, OUTPUT);
  pinMode(PWMPinB, OUTPUT);//Set motor outputs
  pinMode(buttonLeft, INPUT);
  pinMode(buttonRight, INPUT);//buttons
  digitalWrite(buttonLeft, HIGH);
  digitalWrite(buttonRight, HIGH);//enable internal pullups
  pinMode(CPin1, INPUT);//set feedback input
  currentTimedebounce = millis();
  currentTimefeedback = 0;//Set initial times
  maxAmps = 15;// SET MAX CURRENT HERE
}//end setup

void loop()
{
  latchButtons();//check buttons, see if we need to move
  moveMotor();//check latches, move motor in or out
}//end main loop

void latchButtons()
{
  if (digitalRead(buttonLeft)==LOW)//left is forwards
 {
    currentTimedebounce = millis() - lastButtonpress;// check time since last press
    if (currentTimedebounce > debounceTime && dontExtend == false)//once you've tripped dontExtend, ignore all forwards presses
    {
      leftlatch = !leftlatch;// if motor is moving, stop, if stopped, start movingfirstRun = true;// set firstRun flag to ignore current spike
      fullyRetracted = false; // once you move forwards, you are not fully retracted
      lastButtonpress = millis();//store time of last button press
      return;
    }//end if
  }//end btnLEFT

  if (digitalRead(buttonRight)==LOW)//right is backwards
  {
    currentTimedebounce = millis() - lastButtonpress;// check time since last press
    if (currentTimedebounce > debounceTime)
    {
      rightlatch = !rightlatch;// if motor is moving, stop, if stopped, start moving
      firstRun = true;// set firstRun flag to ignore current spike
      lastButtonpress = millis();//store time of last button press
      return;
    }//end if
  }//end btnRIGHT
}//end latchButtons

void moveMotor()
{
  if (leftlatch == HIGH) motorForward(255); //speed = 0-255
  if (leftlatch == LOW) motorStop();
  if (rightlatch == HIGH) motorBack(255); //speed = 0-255
  if (rightlatch == LOW) motorStop();
}//end moveMotor

void motorForward(int speeed)
{
  while (dontExtend == false && leftlatch == HIGH)
  {
    digitalWrite(EnablePin, HIGH);
    analogWrite(PWMPinA, speeed);
    analogWrite(PWMPinB, 0);//move motor
    if (firstRun == true) delay(firstfeedbacktimedelay); // bigger delay to ignore current spike
    else delay(feedbacktimedelay); //small delay to get to speed
    getFeedback();
    firstRun = false;
    latchButtons();//check buttons again
  }//end while
}//end motorForward

void motorBack (int speeed)
{
  while (rightlatch == HIGH)
  {
    digitalWrite(EnablePin, HIGH);
    analogWrite(PWMPinA, 0);
    analogWrite(PWMPinB, speeed);//move motor
    if (firstRun == true) delay(firstfeedbacktimedelay);// bigger delay to ignore current spike
    else delay(feedbacktimedelay); //small delay to get to speed
    getFeedback();
    firstRun = false;
    latchButtons();//check buttons again
  }//end while
  dontExtend = false;//allow motor to extend again, after it has been retracted
}//end motorBack

void motorStop()
{
  analogWrite(PWMPinA, 0);
  analogWrite(PWMPinB, 0);
  digitalWrite(EnablePin, LOW);
  firstRun = true;//once the motor has stopped, reenable firstRun to account for startup current spikes
}//end stopMotor

void getFeedback()
{
  CRaw = analogRead(CPin1); // Read current
  if (CRaw == 0 && hitLimits < hitLimitsmax) hitLimits = hitLimits + 1;
  else hitLimits = 0; // check to see if the motor is at the limits and the current has stopped
  if (hitLimits == hitLimitsmax && rightlatch == HIGH)
  {
    rightlatch = LOW; // stop motor
    fullyRetracted = true;
  }//end if
  else if (hitLimits == hitLimitsmax && leftlatch == HIGH)
  {
    leftlatch = LOW;//stop motor
    hitLimits = 0;
  }//end if
  if (CRaw > maxAmps)
  {
    dontExtend = true;
    leftlatch = LOW; //stop if feedback is over maximum
  }//end if
  lastfeedbacktime = millis();//store previous time for receiving feedback
}//end getFeedback
المشغل الصغير PA-01 الجديد والمحسّن (ترقية لـ PA-14) هو الطراز الحالي الذي نقدمه مع العديد من المزايا الإضافية. للمقارنة، اطّلع على الجداول أدناه وقم بالترقية بثقة!
|
|
PA-01 |
PA-14 |
|
خيارات الحمولة الديناميكية |
16, 28, 56, 112, 169, 225 lbs |
35, 50, 75, 110, 150 lbs |
|
أعلى حمولة |
225 lbs |
150 lbs |
|
أعلى السرعة |
3.54 "/sec |
2.00"/sec |
|
تصنيف IP |
IP65 |
IP54 |
|
خيارات طول الشوط |
1" إلى 40" |
1" إلى 40" |
|
تغذية راجعة بتأثير هول |
اختياري |
لا |
مع هذه الشيفرة الأساسية، ستتمكن من مراقبة التغذية الراجعة لمشغلك الخطي بنجاح. في الجزء الثاني سنتعمّق أكثر في كيفية عمل الشيفرة وكيفية تعديلها حسب رغبتك. نأمل أن تكون قد وجدت هذا المنشور مفيدًا، وترقب الجزء الثاني خلال الأسابيع القادمة. إذا رغبت في طلب أي من الوحدات التي استخدمناها في هذا المثال أو أردت معرفة المزيد عن منتجاتنا، يرجى التواصل معنا.