


Adjustable beds are among the most highly sought-after bed solutions on the market since they have the flexibility of adjusting to many different configurations to maximize comfort, health benefits, and versatility. When converting their Ford Transit into a campervan, Ashleigh & Zach knew they wanted to keep the same benefits of adjustable beds to allow for the head and foot sections to rise separately. This was something they had never seen anyone else do in a van and required them to build an adjustable frame from scratch. It also meant their bed platform had to be constructed differently than most. This article will cover how Ashleigh & Zach made their very own DIY adjustable beds for van life!
Building the Bed Frame

Ashleigh & Zach drew inspiration from another Van Life Instagram account @engineerswhovanlife who used 80/20 extruded aluminum to build their bed frame. After studying their design, Ashleigh & Zach added additional extruded aluminum to support the linear actuators that adjust their bed.
The bed frame was first put together outside of the van before more adjustments were made to accommodate linear actuators. Their bed frame consisted of 80/20 aluminum beams spanning the entire width of the van, securing to both walls, and providing the surface the bed platform would rest on. It also included a lower level where electric linear actuators could be mounted.
Constructing the Bed Platform

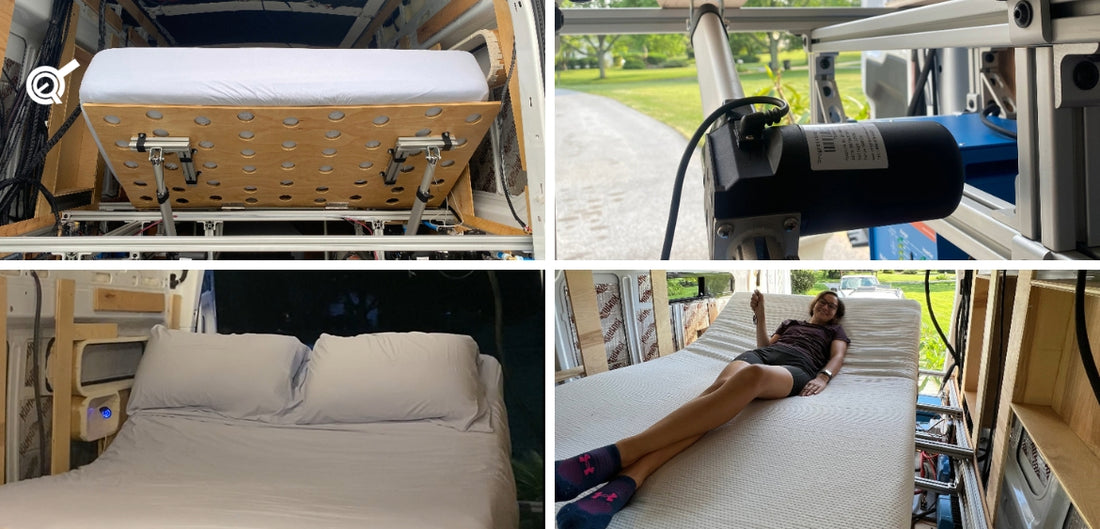
The next step was figuring out how to build a bed platform that would fold in the proper locations. After taking measurements of the underside of their old bed frame, Ashleigh & Zach designed their very own adjustable bed platform from scratch. Their wooden bed platform consisted of 4 separate pieces of 1/2" birch plywood.
The 1st piece moves to adjust the head, the 2nd piece mounts to the frame to serve as the anchor, and the bottom two move to adjust the height at their knees. Using hinges, the four pieces were connected to ensure a full range of motion with what the actuators could provide. After cutting the plywood to size, a hole saw was used to cut ventilation holes. The entire wooden platform later got coated with polyurethane for added protection.

Choosing an Actuator

When multiple actuators are required to travel synchronously, we recommend actuators with hall effect sensors. This is because they have hall effect feedback that goes to a control box which would then be able to make the needed corrections if one side travels at a different speed from the other. Differing speeds can sometimes happen from slightly unequal weight distribution or the speed tolerance from the DC motors (+/- 10%) in the actuators.
After calling customer support, our team was able to assist Ashleigh & Zach in choosing 4x PA-04-10-400-HS Hall Effect Sensor Actuators and 2x PA-40 Control Boxes. Being 12 VDC operated ensured future compatibility with their van’s 12 VDC power source while the 400 lbs force rating of each actuator offered them plenty of lifting capacity. They enjoyed the power and reliability of our linear actuators as it brought them confidence in making their dream become a reality. With the push of a button, the PA-40 wireless remotes would allow them to raise the head, the foot, or both sections of their adjustable bed.
Mounting the Actuators

At the head section of the bed, the rear mounting holes for PA-04 HS actuators were mounted to the lower level of the frame using roll-in T-nuts and bolts while the front mounting holes connected to the platform. L-shaped 80/20 supports were made and connected to the bed platform using our BRK-02 mounting brackets. Then, the actuators were mounted to that L-support by using T-nuts.

For the foot section of the bed, mounting was done vertically instead of at an angle due to space constraints. At their max extension, the actuators would have exceeded the hinges' range of motion if the original design was used, so they had to pivot! To do this, they attached the actuators vertically to the underside of the bed and let them hang. They then measured the distance between the bottom of the actuators and the floor and constructed wooden boxes with 1/2" birch plywood to mount the feet actuators to.

Connecting Power Source and Control Box

After mounting, the actuators had to be connected to electrical power. The van has a 12V 540 Ah battery bank, so the two control boxes were connected to the van’s 12V fuse block. During the first attempted test, an improperly sized fuse was used and blew out the control box. This control box ended up being replaced and moved to a 40A fuse on the fuse block plus its inline 30A fuse, after which everything ran perfectly!
Testing and Troubleshooting

After getting everything set up, it was time to test the platform. Testing started with just one mattress, then added one person, then another. Ashleigh & Zach moved around to make sure it was structurally sound and found a few areas that needed troubleshooting:
- Swapped Wood Screws for Bolts: When the L-shaped supports were first attached to the bed platform, wood screws were used to secure them. These ripped out when they first tried laying on it - To fix this, they simply drilled holes through the plywood and replaced the screws with 1/4-20 bolts and adding a few extra bolts for good measure. Silicone II was then used to cover the heads of the screws that touch the mattress to prevent any tears.
- Reinforced the Headboard Support: The platform was bending a bit at the head when subjected to the weight of Ashleigh & Zach combined with the mattress. To add additional support, they replaced 2 pieces of 80/20 that were each supporting their own actuator with one longer 45.5" piece of 80/20 that connects to both actuators and spanning the whole width of the platform. This has prevented any further bending from happening.
This adjustable bed project has been the most unique part of Ashleigh & Zach’s van so far and they are thrilled with the result! Now that they have slept in the adjustable bed for a few nights, they can officially say all the extra work, time, and money was 100% worth it!
IN SUMMARY
We hope you found this article as interesting as we did, especially if you were looking for ideas on making your very own DIY adjustable bed for campervans!
Thank you, Ashleigh & Zach, for sharing your project! We hope your adjustable bed continues bringing you plenty of restful sleep over the years!
If you have any queries about our electric linear actuators or wish to discuss our other products further, please do not hesitate to reach out to us! We are experts in what we do and will be happy to assist in any way we can.
sales@progressiveautomations.com | 1-800-676-6123
