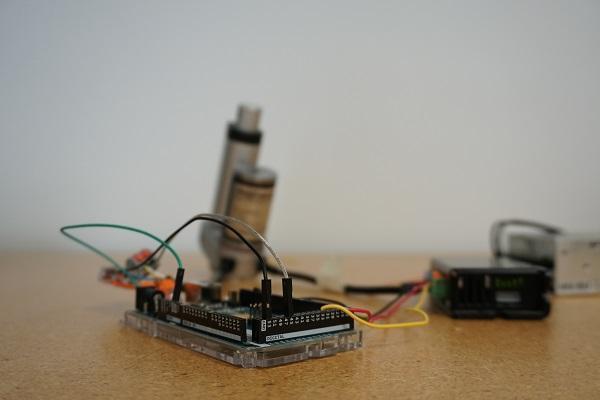
This tutorial will help in understanding the controls of a brushless DC motor controller when paired with an Arduino and a linear actuator. This program can be used to continuously extend and retract the stroke of an actuator.
Before we get started, let’s go over the components we will be using in this tutorial:
- Arduino Mega (Arduino Uno can be used as well).
- LC-241.
- PA-14 with a brushless motor.
- PS-13-12 power supply.
- Jumper Wires.
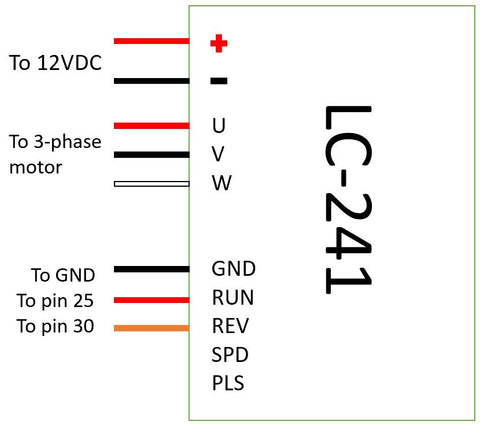
The linear actuator has 2 sets of wires coming out of it, one set is for the motor and the other set is for the limit switches. The schematic in the figure above shows how to wire the components together.
PIN SETUP CODE
int out_lim = 45; // outer limit switch pin
int in_lim = 53; // inner limit switch pin
int run_f = 25; // run pin on controller
int run_r = 30; // reverse pin on controller
This part of the code takes care of the initialization of pins that will be used for receiving and sending data. All digital pins were used in this case, but analog ones can be used as well.
SETUP LOOP CODE
void setup() {
Serial.begin(9600); // initialize serial communication at 9600 bits per second
pinMode(out_lim, INPUT_PULLUP); // configures pin 45 as input pin
pinMode(in_lim, INPUT_PULLUP); // configures pin 53 as input pin
pinMode(run_f, OUTPUT); // configures pin 25 as output pin
pinMode(run_r, OUTPUT); // configures pin 30 as output pin
retract(); // retracts the stroke on startup
delay(500);
}
The “setup” loop configures which pins will be used for output and which will be used for input. As can be seen in the code, pins connected to limits witches will be used to read limit switch states and pins connected to “RUN” and “REV” on LC-241 will be used to write to it. Initially, the code also runs a retraction function to retract all the way in before starting.
FUNCTION DEFINITIONS CODE
void extend() // this function enables the motor to run
{
digitalWrite(run_f, LOW);
digitalWrite(run_r, HIGH);
}
void retract() // this function reverses the direction of motor
{
digitalWrite(run_f, LOW);
digitalWrite(run_r, LOW);
}
void run_stop() // this function disables the motor
{
digitalWrite(run_f, HIGH);
digitalWrite(run_r, HIGH);
}
This part explains the functions used to control the motor power and direction. We will be enabling or disabling the motor by writing “0” or “1” to “RUN” pin and then the same commands to the “REV” pin to reverse the direction of the motor.
MAIN LOOP CODE
Void loop() {
int out_lim_state = digitalRead(out_lim); // reads the limit switches and saves its value
int in_lim_state = digitalRead(in_lim);
Serial.print("outer limit switch value "), Serial.println(out_lim_state); // 0 -> limit switch is pressed
Serial.print("inner limit switch value "), Serial.println(in_lim_state); // 1 -> limit switch is not pressed
if (out_lim_state == 0 && in_lim_state == 1) // if outer limit switch is pressed and inner is not (extended all the way)
{
retract(); // retract the stroke
}
else if (out_lim_state == 1 && in_lim_state == 0) // if inner limit switch is pressed and outer is not (reracted all the way)
{
extend(); // extend the stroke
}
The “loop” loop basically just reads the inputs from limit switches to check if the switches are pressed or not and then based on that it just changes the direction of the motor.
Most of the linear actuators in the market come installed with a brushed DC motor and so the duty cycle available with that motor makes it somewhat impossible to continuously run the unit. At Progressive Automations, we give our customers the freedom to opt for a brushless DC motor for our PA-14 model giving them even more options for their projects.


