En la guía de hoy, veremos cómo averiguar cuánta fuerza está aplicando un actuador lineal supervisando la cantidad de corriente que consume. Esta será una de nuestras guías más avanzadas y requerirá codificación, calibración y programación complejas. Cubriremos la monitorización de entradas analógicas y cómo se utilizan sus funciones. Para este proyecto, usaremos un MegaMoto Plus, un actuador lineal (estamos utilizando nuestro PA-14 miniactuador), un Arduino Uno y una fuente de alimentación de al menos 12 V.

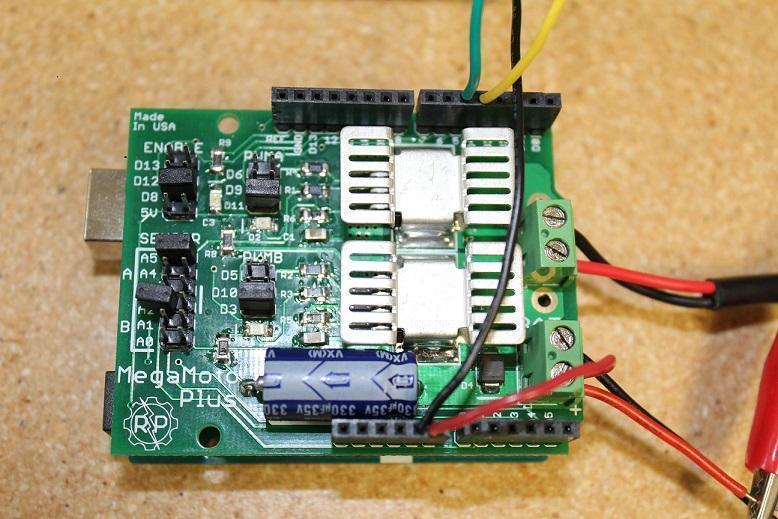
Para empezar, necesitaremos cablear para conectar todo. Comienza insertando el MegaMoto en el Arduino; basta con colocar el MegaMoto encima del Uno para hacerlo. Luego conecta un cable desde el terminal BAT+ del MegaMoto al pin Vin del Uno.

Ahora debemos conectar los cables del actuador lineal a los terminales A y B del MegaMoto y conectar la fuente de 12 V a BAT+ y GND a BAT-. También necesitamos cablear dos botones para el control, conectando cada uno entre un pin sin usar y GND. Recomendamos montar los botones en una protoboard.

Ahora toca programar con el Arduino Uno. Queremos programar los botones para que controlen cuándo el actuador se extenderá y retraerá. La corriente comenzará a supervisarse una vez que el actuador se extienda y esto nos permitirá observar si supera el límite máximo de corriente o no. Si supera el límite, el actuador se detendrá automáticamente hasta que decidas retraerlo. Teniendo en cuenta que los motores dentro de los actuadores tienen un gran pico de corriente al alimentarse por primera vez, el código que introducimos tendrá un breve retardo antes de empezar a monitorizar la corriente. Este código será capaz de detectar cuándo el actuador ha alcanzado sus finales de carrera, que es cuando la corriente cae a 0.
const int EnablePin = 8;
const int PWMPinA = 11;
const int PWMPinB = 3; / pins for Megamoto
const int buttonLeft = 4;
const int buttonRight = 5;/buttons to move the motor
const int CPin1 = A5; / motor feedback

int leftlatch = LOW;
int rightlatch = LOW;/motor latches (used for code logic)
int hitLimits = 0;/start at 0
int hitLimitsmax = 10;/values to know if travel limits were reached

longlastfeedbacktime = 0; / must be long, else it overflows
int firstfeedbacktimedelay = 750; /first delay to ignore current spik
int feedbacktimedelay = 50; /delay between feedback cycles, how often you want the motor to be checked
currentTimefeedback = 0; / must be long, else it overflows
unceTime = 300; /amount to debounce buttons, lower values makes the buttons more sensitivelong lastButtonpress = 0; / timer for debouncing
long currentTimedebounce = 0;
int CRaw = 0; / input value for current readings
int maxAmps = 0; / trip limit
bool dontExtend = false;
bool firstRun = true;
bool fullyRetracted = false;/program logic

void setup()
{
 Serial.begin(9600);
 pinMode(EnablePin, OUTPUT);
 pinMode(PWMPinA, OUTPUT);
 pinMode(PWMPinB, OUTPUT);/Set motor outputs
 pinMode(buttonLeft, INPUT);
 pinMode(buttonRight, INPUT);/buttons
 digitalWrite(buttonLeft, HIGH);
 digitalWrite(buttonRight, HIGH);/enable internal pullups
 pinMode(CPin1, INPUT);/set feedback input
 currentTimedebounce = millis();
 currentTimefeedback = 0;/Set initial times
 maxAmps = 15;/ SET MAX CURRENT HERE
}/end setup

void loop()
{
 latchButtons();/check buttons, see if we need to move
 moveMotor();/check latches, move motor in or out
}/end main loop

void latchButtons()
{
 if (digitalRead(buttonLeft)==LOW)/left is forwards
 {
 currentTimedebounce = millis() - lastButtonpress;/ check time since last press
 if (currentTimedebounce > debounceTime && dontExtend == false)/once you've tripped dontExtend, ignore all forwards presses
 {
 leftlatch = !leftlatch;/ if motor is moving, stop, if stopped, start movingfirstRun = true;/ set firstRun flag to ignore current spike
 fullyRetracted = false; / once you move forwards, you are not fully retracted
 lastButtonpress = millis();/store time of last button press
 return;
 }/end if
 }/end btnLEFT

 if (digitalRead(buttonRight)==LOW)/right is backwards
 {
 currentTimedebounce = millis() - lastButtonpress;/ check time since last press
 if (currentTimedebounce > debounceTime)
 {
 rightlatch = !rightlatch;/ if motor is moving, stop, if stopped, start moving
 firstRun = true;/ set firstRun flag to ignore current spike
 lastButtonpress = millis();/store time of last button press
 return;
 }/end if
 }/end btnRIGHT
}/end latchButtons

void moveMotor()
{
 if (leftlatch == HIGH) motorForward(255); /speed = 0-255
 if (leftlatch == LOW) motorStop();
 if (rightlatch == HIGH) motorBack(255); /speed = 0-255
 if (rightlatch == LOW) motorStop();
}/end moveMotor

void motorForward(int speeed)
{
 while (dontExtend == false && leftlatch == HIGH)
 {
 digitalWrite(EnablePin, HIGH);
 analogWrite(PWMPinA, speeed);
 analogWrite(PWMPinB, 0);/move motor
 if (firstRun == true) delay(firstfeedbacktimedelay); / bigger delay to ignore current spike
 else delay(feedbacktimedelay); /small delay to get to speed
 getFeedback();
 firstRun = false;
 latchButtons();/check buttons again
 }/end while
}/end motorForward

void motorBack (int speeed)
{
 while (rightlatch == HIGH)
 {
 digitalWrite(EnablePin, HIGH);
 analogWrite(PWMPinA, 0);
 analogWrite(PWMPinB, speeed);/move motor
 if (firstRun == true) delay(firstfeedbacktimedelay);/ bigger delay to ignore current spike
 else delay(feedbacktimedelay); /small delay to get to speed
 getFeedback();
 firstRun = false;
 latchButtons();/check buttons again
 }/end while
 dontExtend = false;/allow motor to extend again, after it has been retracted
}/end motorBack

void motorStop()
{
 analogWrite(PWMPinA, 0);
 analogWrite(PWMPinB, 0);
 digitalWrite(EnablePin, LOW);
 firstRun = true;/once the motor has stopped, reenable firstRun to account for startup current spikes
}/end stopMotor

void getFeedback()
{
 CRaw = analogRead(CPin1); / Read current
 if (CRaw == 0 && hitLimits < hitLimitsmax) hitLimits = hitLimits + 1;
 else hitLimits = 0; / check to see if the motor is at the limits and the current has stopped
 if (hitLimits == hitLimitsmax && rightlatch == HIGH)
 {
 rightlatch = LOW; / stop motor
 fullyRetracted = true;
 }/end if
 else if (hitLimits == hitLimitsmax && leftlatch == HIGH)
 {
 leftlatch = LOW;/stop motor
 hitLimits = 0;
 }/end if
 if (CRaw > maxAmps)
 {
 dontExtend = true;
 leftlatch = LOW; /stop if feedback is over maximum
 }/end if
 lastfeedbacktime = millis();/store previous time for receiving feedback
}/end getFeedback
El nuevo y mejorado miniactuador PA-01 (actualización del PA-14) es el modelo actual que ofrecemos con una variedad de ventajas adicionales. Para comparar, consulta las tablas de abajo y actualiza con confianza.
|
|
PA-01 |
PA-14 |
|
Opciones de carga din�E1mica |
16, 28, 56, 112, 169, 225 libras |
35, 50, 75, 110, 150 libras |
|
Carga m�E1xima |
225 libras |
150 libras |
|
Velocidad m�E1xima |
3,54 "/s |
2,00"/seg |
|
�Dndice de protecci�F3n |
IP65 |
IP54 |
|
Opciones de carrera |
1" to 40" |
1" to 40" |
|
Retroalimentaci�F3n por efecto Hall |
Opcional |
No |
Con este c�F3digo b�E1sico, podr�E1s supervisar correctamente la retroalimentaci�F3n de tu actuador lineal. En la Parte II profundizaremos en c�F3mo funciona el c�F3digo y c�F3mo editarlo a tu gusto. Esperamos que te haya resultado �FAtil esta publicaci�F3n y permanece atento a la Parte II en las pr�F3ximas semanas. Si deseas pedir cualquiera de las unidades que usamos en este ejemplo o quieres saber m�E1s sobre nuestros productos, por favor cont�E1ctanos.