
The PA-12 is a high precision actuator that can be controlled with Arduino. This PA-12 introduction guide will feature control methods and implementation with the PA-12 Arduino API.
There are two versions of the PA-12. The PA-12-R has a coreless DC servo motor and RS-485 communication protocol. The PA-12-T has a cored DC servo motor and TTL/PWM communication protocol.
Getting started with the PA-12 and Arduino will depend on the version of PA-12 that is being implemented. In this tutorial, the PA-12-10645012R is used – 1.06” Stroke, 4.50LBS of force, 12VDC coreless DC motor. The coreless motor signifies that the communication protocol for this actuator is RS-485.
The Arduino Leonardo/Uno does not have a RS-485 communication protocol, but it does have TTL. We will be using a TTL to RS-485 module to communicate with the linear actuator Arduino in this tutorial.
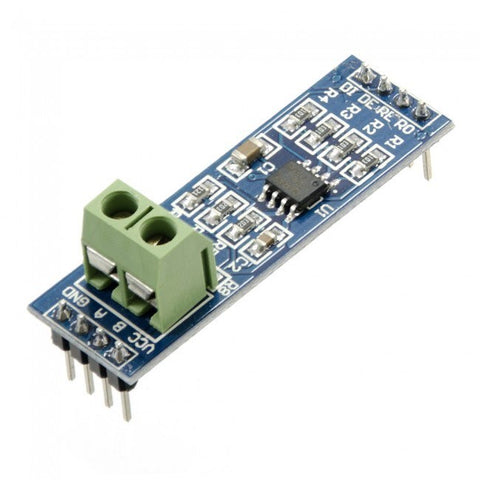
Figure 1 - RS-485 to TTL Arduino Module
PA-12 Control Operation
The PA-12 is controlled directly with data packets sent through TTL or RS-485 communication. Each data packet contains information that is used to perform a certain function of the PA-12 or to receive the current state of the device. The current state of the device could be, for example, the servo ID, voltage value, position of the actuator’s rod, etc.
Equipment and Software
- Arduino Leonardo
- TTL to RS-485 Module
- PA-12-10645012R Actuator
- +12VDC Power Supply
- Jumper Wires
- Arduino IDE
- PA-12 Arduino API
PA-12 API
The PA-12 API can be downloaded here. This API contains the following files and folders:
- PA12.ino
- Contains the PA-12 command structures and functions that transfer and receive data to/from the PA-12
- All functions that are used within the sample codes or will be implemented in your code are stored within this file
- PA12.h
- The header file contains the communication protocol and serial communication header files
- Contains function and variable declarations for all PA12 features and functionality
- setPosition, ServoID, presentSpeed, forceEnable
- Utility Files
- Sample Codes
- The sample code can be used to easily implement PA-12 control into your own system
- All sample codes are programmed for use with Arduino Leonardo, however, the variables used for the transmit and receive pins can be altered to be compatible with the microcontroller/Arduino that you already have
To Import PA12 Library
Select ‘Sketch’ --> Include Library --> Add.ZIP Library. All files located in the PA12 folder will be imported directly into the linear actuator Arduino library. This will then allow you to use the PA12 functions to control the actuator.
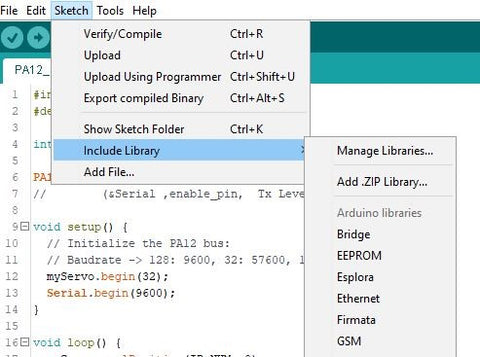
Figure 2 - Arduino Library Import
Available Commands for PA-12
A table of commands is displayed below. For more info on the commands, review the PA12.ino for coding information. We will be covering the basic commands in this tutorial. Future tutorials will include more advanced functions and control techniques.
Read Functions
The functions located in the table below are read-only and return a value.
|
Read Function |
Variable |
Description |
|---|---|---|
|
myServo.getModelNumber(ID_NUM) |
ID_NUM |
PA-12 model number |
|
myServo.Version(ID_NUM) |
ID_NUM |
PA-12 motor version number |
|
myServo.CalStroke (ID_NUM, *Length*) |
ID_NUM, Length = Short, Long, or Center |
Stroke position calibration check |
|
myServo.presentVolt((ID_NUM)/10) |
ID_NUM |
Input voltage check |
|
myServo.presentTemperature(ID_NUM) |
ID_NUM |
Current temperature of motor |
|
myServo.MaxTemperature(ID_NUM) |
ID_NUM |
Read the maximum temperature limit |
|
myServo.presentPosition(ID_NUM) |
ID_NUM |
Current position of the actuator |
|
myServo.moving(ID_NUM) |
ID_NUM |
Returned value of motor status. 1 = Moving, 0 = Stopped |
|
myServo.limitVolt(ID_NUM, *Highest/Lowest*) |
ID_NUM, High Voltage Level = Highest or Low Voltage Level = Lowest |
Read the high or low voltage setting |
|
myServo.alarmLed(ID_NUM) |
ID_NUM |
Reads the status of the alarm LED. 1 = ON, 0 = Off |
|
myServo.alarmShutdown(ID_NUM) |
ID_NUM |
Reads the status of the alarm shutdown mode |
|
myServo.StrokeLimit(ID_NUM, *Long/Short*) |
ID_NUM, Extend Limit = Long or Retract Limit = Short |
Reads the max and min stroke limits |
|
myServo.ResolutionFactor(ID_NUM) |
ID_NUM |
Reads the servo motor resolution factor |
|
myServo.movingSpeed(ID_NUM) |
ID_NUM |
Reads the value of the servo motor speed |
|
myServo.forceLimit(ID_NUM) |
ID_NUM |
Reads the max force of the servo motor (Volatile Setting) |
|
myServo.maxForce(ID_NUM) |
ID_NUM |
Reads the max force of the servo motor (Non-Volatile Setting) |
Write Functions
|
Write Function |
Variable |
Description |
|---|---|---|
|
myServo(&Serial, enable_pin, Tx Level) |
Serial port number, enable pin, transmission pin |
Communication port setting |
|
myServo.begin(*Baud Setting Value*) |
Baud Setting Value (Refer to Table) |
Serial communication Baud Rate |
|
myServo.ServoID(ID_NUM, ID_Sel) |
ID_NUM, ID_Sel |
Change servo ID value |
|
myServo.ledOn(ID_NUM, *LED RGB Value*) |
ID_NUM, LED RBB Value (Refer to Table) |
Turns on a specified LED |
|
myServo.MaxTemperature(ID_NUM, Temperature) |
ID_NUM, Temperature |
Write the maximum temperature limit |
|
myServo.goalPosition(ID_NUM, *Position Value*) |
ID_NUM, Position Value (Refer to Table) |
Set a desired stroke position |
|
myServo.limitVolt(ID_NUM, *Highest/Lowest*, LimitVolt) |
ID_NUM, Higher Value = Highest or Lower Value = Lowest, LimitVolt |
Set the high or low voltage setting |
|
myServo.alarmLed(ID_NUM, *Alarm Variable*) |
ID_NUM, Alarm Bit |
Alarm LED Setting. Refer to table for more info. |
|
myServo.alarmShutdown(ID_NUM, *enable*) |
ID_NUM, Enable: 0 = off, 1 = on |
Motor alarm shutdown setting. If alarm is activated, the motor can be shutoff |
|
myServo.StrokeLimit(ID_NUM, *Long/Short*, *Position Value*) |
ID_NUM, Extend Limit = Long or Retract Limit = Short, Position Value (Refer to Table) |
Writes the max and min stroke limits |
|
myServo.ResolutionFactor(ID_NUM, *Resolution Factor*) |
ID_NUM, Resolution Factor (Refer to table) |
Sets the resolution value for actuator stroke positioning. |
|
myServo.movingSpeed(ID_NUM, *Moving Speed Value*) |
ID_NUM, Moving Speed Value (Refer to table) |
Sets the speed of the servo motor |
|
myServo.forceLimit(ID_NUM, *Force Value*) |
ID_NUM, Force Value (Refer to Table) |
Sets the max force of the servo motor (Volatile Setting) |
|
myServo.maxForce(ID_NUM, *Force Value*) |
ID_NUM, Force Value (Refer to Table) |
Sets the max force of the servo motor (Non-Volatile Setting) |
Variable Settings
The tables below contain the variable value that will be entered into the functions.
Baud Rate
|
Baud Variable Value |
Baud Rate |
|
16 |
115200 |
|
32 |
57600 |
|
64 |
19200 |
|
128 |
9600 |
LED Value
|
LED RGB Value |
|
RED |
|
GREEN |
|
BLUE |
Servo ID
|
Servo ID Value |
|
0 |
|
1 - 253 |
|
254 |
For Servo Motor ID variable ID_NUM: A total of 255 options are available. The value of 0 is the default setting. You may select a value from 1 to 253 for an individual ID. The value of 254 is reserved for a broadcasting ID, therefore activating all PA-12’s located within a network.
Alarm Settings
|
Alarm Setting |
Alarm Setting Value |
|
Input Voltage Error |
0 |
|
Stroke Limit Error |
1 |
|
Range Error |
3 |
|
Checksum Error |
4 |
|
Overload Error |
5 |
|
Instruction Error |
6 |
|
*Reserved* |
7 |
Stroke Resolution Factor
|
Resolution Factor Value |
Resolution |
|
1 |
4096 |
|
2 |
2048 |
|
3 |
1024 |
|
4 |
512 |
The higher the resolution value, the higher positional accuracy.
Moving Speed
|
Moving Speed Value |
Speed Setting |
|
0 |
Max Speed |
|
1 - 1023 |
1 = Lowest, 1023 = Highest |
Force Value
|
Force Value |
Force Setting |
|
0 - 1023 |
1 = Lowest, 1023 = Highest |
Position Value
|
Position Value |
Position |
|
0 - 4095 |
0 = Fully Retracted, 4095 = Fully Extended |
Wiring Guide
The PA-12 is connected to the RS-485 module, which is then directly connected to the Arduino. This version of the PA-12 requires a 12VDC power supply for the servo motor power.
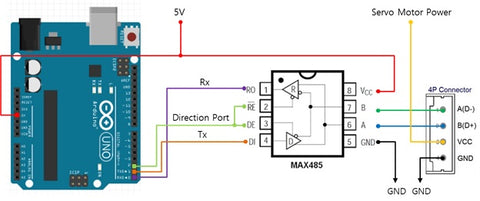
| RS-485 Side A | Arduino |
| DI | Pin 1 |
| DE | Pin 2 |
| RE | Pin 2 |
| R0 | Pin 0 |
Pin 0 on the Arduino is the TTL receive. Pin 1 on the Arduino Leonardo is the TTL transmit. Pin 2 within the sample codes are set up such that they are used as the enable pin.
|
PA-12 4-Pin Connector |
Value |
|
Black |
GND |
|
Red |
Servo Motor +VDC |
|
White |
Communication Pin A |
|
Yellow |
Communication Pin B |
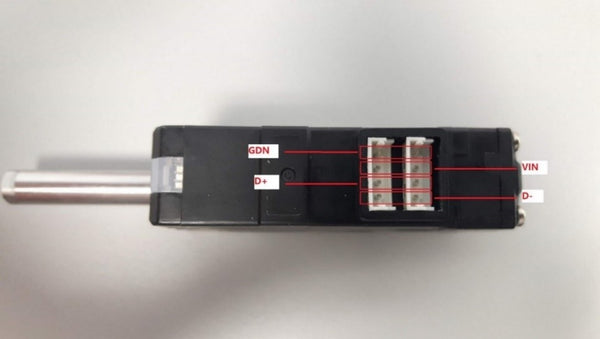
Figure 3- PA-12 Port Connections
|
RS-485 Side B |
Connection |
|
VCC1 |
+5VDC (Arduino) |
|
A |
PA-12 White Wire |
|
B |
PA-12 Yellow Wire |
|
GND2 |
Power Supply GND and PA-12 GND |
1The RS-485 module receives power from the Arduino’s +5VDC output.
2The ground is shared between the PA-12, power supply, and RS-485 module.
Sample Code
In this tutorial, we will display three sample codes which provide preliminary insight into some of the PA-12’s features, and how they write and read functions can be implemented into your own code.
- PA12_PresentPosition
- PA12_StrokeLimit
- PA12_ForceLimit
1. Present Position
In this code, the user will enter the desired position value between 0 to 4095 within the serial monitor. Once entered, the command is sent to the PA-12 which will then activate the servo motor to move the rod to the desired position. While the motor is in motion, the present position will be displayed until the final position has been reached.

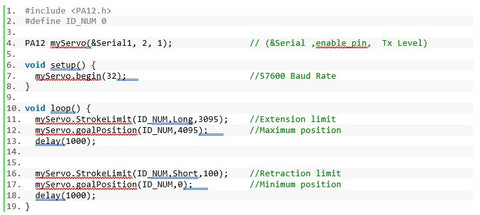
2. Stroke Limit
Within this code, the PA-12 cycles every 1000ms within the inputted extension and retraction limit parameters. The Long and Short designations located in the stroke limit function
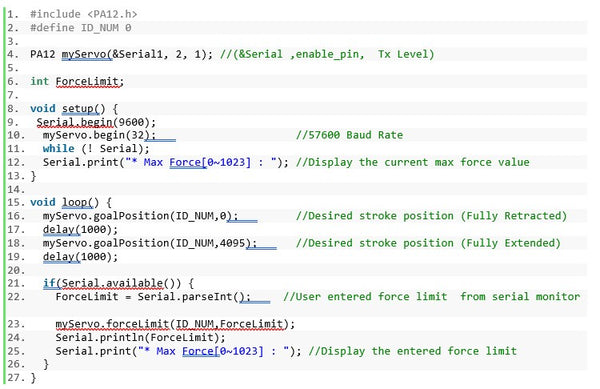
3. Force Limit
The force limit code being displayed here is the volatile version. This means that each time the PA-12 loses power, the force limit value will be reset back to its default setting. The user will enter the force limit value from the serial monitor. In this case, the maximum force value of 0 signifies a low force value, and 1023 signifies a maximum force value.
Future Tutorials
In future tutorials we will be covering:
- Advanced function implementation
- TTL and PWM version PA-12 Control
- Troubleshooting Techniques
- External control methods
The PA-12 is a versatile and highly precise actuator that allows the end-user to achieve direct control over their application. With the right implementation, the PA-12 is able to accomplish exactly what your system requirements may be.
For additional information, please send us an email at sales@progressiveautomations.com, or give our team a call at 1-800-676-6123.