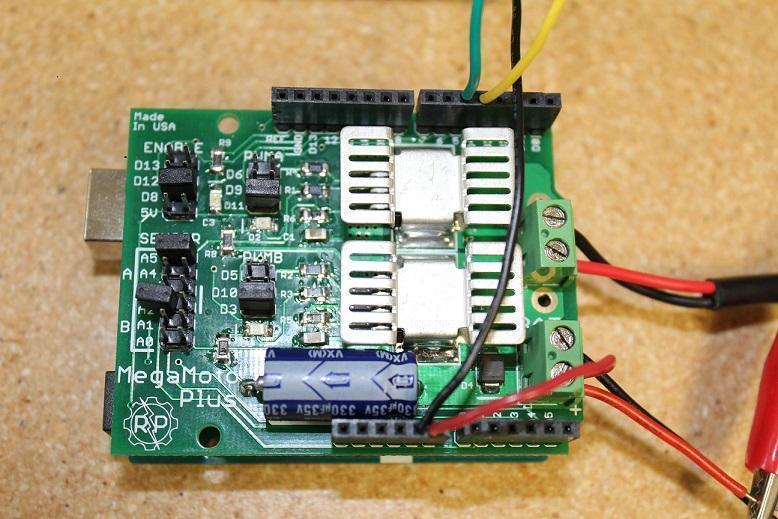
Dans le guide d’aujourd’hui, nous verrons comment déterminer la force qu’exerce un vérin linéaire en surveillant la quantité de courant qu’il consomme. Il s’agit d’un de nos guides les plus avancés et il nécessitera un codage, un calibrage et des réglages relativement complexes. Nous aborderons la surveillance d’une entrée analogique et la façon d’exploiter ses fonctions. Pour ce projet, nous utiliserons un MegaMoto Plus, un vérin linéaire (nous utilisons notre mini vérin PA-14), un Arduino Uno et une alimentation d’au moins 12 V.

Pour commencer, nous devons effectuer le câblage pour tout relier. Commencez par brancher le MegaMoto sur l’Arduino, en plaçant simplement le MegaMoto au-dessus du Uno. Connectez ensuite un fil de la borne BAT+ du MegaMoto à la broche Vin du Uno.

Nous devons maintenant connecter les câbles du vérin linéaire aux bornes A et B du MegaMoto et connecter l’alimentation 12 V à BAT+ et GND à BAT-. Il faut également câbler deux boutons de commande en les reliant chacun entre une broche inutilisée et GND. Nous recommandons de câbler les boutons sur une breadboard.

Passons maintenant au codage avec l’Arduino Uno. Nous voulons programmer les boutons pour qu’ils contrôlent les moments où le vérin s’étendra et se rétractera. Le courant commencera à être surveillé une fois le vérin en extension, ce qui nous permettra de voir s’il dépasse la limite maximale de courant ou non. S’il dépasse la limite, le vérin s’arrêtera automatiquement jusqu’à ce que vous choisissiez de le rétracter. Étant donné que les moteurs des vérins présentent un important pic de courant lors de la mise sous tension, le code que nous saisissons insérera un court délai avant de commencer la surveillance du courant. Ce code pourra également détecter lorsque le vérin atteint ses interrupteurs de fin de course, c’est-à-dire lorsque le courant tombe à 0.
const int EnablePin = 8;
const int PWMPinA = 11;
const int PWMPinB = 3; // pins for Megamoto
const int buttonLeft = 4;
const int buttonRight = 5;//buttons to move the motor
const int CPin1 = A5;  // motor feedback

int leftlatch = LOW;
int rightlatch = LOW;//motor latches (used for code logic)
int hitLimits = 0;//start at 0
int hitLimitsmax = 10;//values to know if travel limits were reached

longlastfeedbacktime = 0; // must be long, else it overflows
int firstfeedbacktimedelay = 750; //first delay to ignore current spik
int feedbacktimedelay = 50; //delay between feedback cycles, how often you want the motor to be checked
currentTimefeedback = 0; // must be long, else it overflows
unceTime = 300; //amount to debounce buttons, lower values makes the buttons more sensitivelong lastButtonpress = 0; // timer for debouncing
long currentTimedebounce = 0;
int CRaw = 0;      // input value for current readings
int maxAmps = 0; // trip limit
bool dontExtend = false;
bool firstRun = true;
bool fullyRetracted = false;//program logic

void setup()
{
  Serial.begin(9600);
  pinMode(EnablePin, OUTPUT);
  pinMode(PWMPinA, OUTPUT);
  pinMode(PWMPinB, OUTPUT);//Set motor outputs
  pinMode(buttonLeft, INPUT);
  pinMode(buttonRight, INPUT);//buttons
  digitalWrite(buttonLeft, HIGH);
  digitalWrite(buttonRight, HIGH);//enable internal pullups
  pinMode(CPin1, INPUT);//set feedback input
  currentTimedebounce = millis();
  currentTimefeedback = 0;//Set initial times
  maxAmps = 15;// SET MAX CURRENT HERE
}//end setup

void loop()
{
  latchButtons();//check buttons, see if we need to move
  moveMotor();//check latches, move motor in or out
}//end main loop

void latchButtons()
{
  if (digitalRead(buttonLeft)==LOW)//left is forwards
 {
    currentTimedebounce = millis() - lastButtonpress;// check time since last press
    if (currentTimedebounce > debounceTime && dontExtend == false)//once you've tripped dontExtend, ignore all forwards presses
    {
      leftlatch = !leftlatch;// if motor is moving, stop, if stopped, start movingfirstRun = true;// set firstRun flag to ignore current spike
      fullyRetracted = false; // once you move forwards, you are not fully retracted
      lastButtonpress = millis();//store time of last button press
      return;
    }//end if
  }//end btnLEFT

  if (digitalRead(buttonRight)==LOW)//right is backwards
  {
    currentTimedebounce = millis() - lastButtonpress;// check time since last press
    if (currentTimedebounce > debounceTime)
    {
      rightlatch = !rightlatch;// if motor is moving, stop, if stopped, start moving
      firstRun = true;// set firstRun flag to ignore current spike
      lastButtonpress = millis();//store time of last button press
      return;
    }//end if
  }//end btnRIGHT
}//end latchButtons

void moveMotor()
{
  if (leftlatch == HIGH) motorForward(255); //speed = 0-255
  if (leftlatch == LOW) motorStop();
  if (rightlatch == HIGH) motorBack(255); //speed = 0-255
  if (rightlatch == LOW) motorStop();
}//end moveMotor

void motorForward(int speeed)
{
  while (dontExtend == false && leftlatch == HIGH)
  {
    digitalWrite(EnablePin, HIGH);
    analogWrite(PWMPinA, speeed);
    analogWrite(PWMPinB, 0);//move motor
    if (firstRun == true) delay(firstfeedbacktimedelay); // bigger delay to ignore current spike
    else delay(feedbacktimedelay); //small delay to get to speed
    getFeedback();
    firstRun = false;
    latchButtons();//check buttons again
  }//end while
}//end motorForward

void motorBack (int speeed)
{
  while (rightlatch == HIGH)
  {
    digitalWrite(EnablePin, HIGH);
    analogWrite(PWMPinA, 0);
    analogWrite(PWMPinB, speeed);//move motor
    if (firstRun == true) delay(firstfeedbacktimedelay);// bigger delay to ignore current spike
    else delay(feedbacktimedelay); //small delay to get to speed
    getFeedback();
    firstRun = false;
    latchButtons();//check buttons again
  }//end while
  dontExtend = false;//allow motor to extend again, after it has been retracted
}//end motorBack

void motorStop()
{
  analogWrite(PWMPinA, 0);
  analogWrite(PWMPinB, 0);
  digitalWrite(EnablePin, LOW);
  firstRun = true;//once the motor has stopped, reenable firstRun to account for startup current spikes
}//end stopMotor

void getFeedback()
{
  CRaw = analogRead(CPin1); // Read current
  if (CRaw == 0 && hitLimits < hitLimitsmax) hitLimits = hitLimits + 1;
  else hitLimits = 0; // check to see if the motor is at the limits and the current has stopped
  if (hitLimits == hitLimitsmax && rightlatch == HIGH)
  {
    rightlatch = LOW; // stop motor
    fullyRetracted = true;
  }//end if
  else if (hitLimits == hitLimitsmax && leftlatch == HIGH)
  {
    leftlatch = LOW;//stop motor
    hitLimits = 0;
  }//end if
  if (CRaw > maxAmps)
  {
    dontExtend = true;
    leftlatch = LOW; //stop if feedback is over maximum
  }//end if
  lastfeedbacktime = millis();//store previous time for receiving feedback
}//end getFeedback
Le mini vérin PA-01 (mise à niveau du PA-14), nouveau et amélioré, est le modèle que nous proposons actuellement, avec une variété d’atouts supplémentaires. Pour comparer, consultez les tableaux ci-dessous et mettez à niveau en toute confiance !
|
|
PA-01 |
PA-14 |
|
Options de charge dynamique |
16, 28, 56, 112, 169, 225 lbs |
35, 50, 75, 110, 150 lbs |
|
Charge maximale |
225 lbs |
150 lbs |
|
Vitesse maximale |
3.54 "/sec |
2.00"/sec |
|
Indice de protection (IP) |
IP65 |
IP54 |
|
Options de course |
1" to 40" |
1" to 40" |
|
Rétroaction à effet Hall |
En option |
No |
Avec ce code de base, vous pourrez surveiller avec succès la rétroaction de votre vérin linéaire. Dans la Partie II, nous approfondirons le fonctionnement du code et la manière de le modifier selon vos besoins. Nous espérons que cet article vous a été utile ; restez à l’écoute pour la Partie II dans les prochaines semaines. Si vous souhaitez commander l’une des unités utilisées dans cet exemple ou en savoir plus sur nos produits, veuillez nous contacter.