Choosing suitable linear actuators to open a trapdoor application can be a tricky process, especially during the early stages of a new project. While it is possible to make estimations for how much force is needed and rough space requirements, using a calculator tool with a trapdoor simulator can truly improve the convenience of making adjustments to the initial design ideas. In this article, we will cover how to use our linear actuator calculator tool as a reference to help bring you one step closer to finding suitable actuators for trapdoor-type applications. We will also discuss how to interpret the results and make the best choice for your project.
Getting Started with Our Calculator Tool

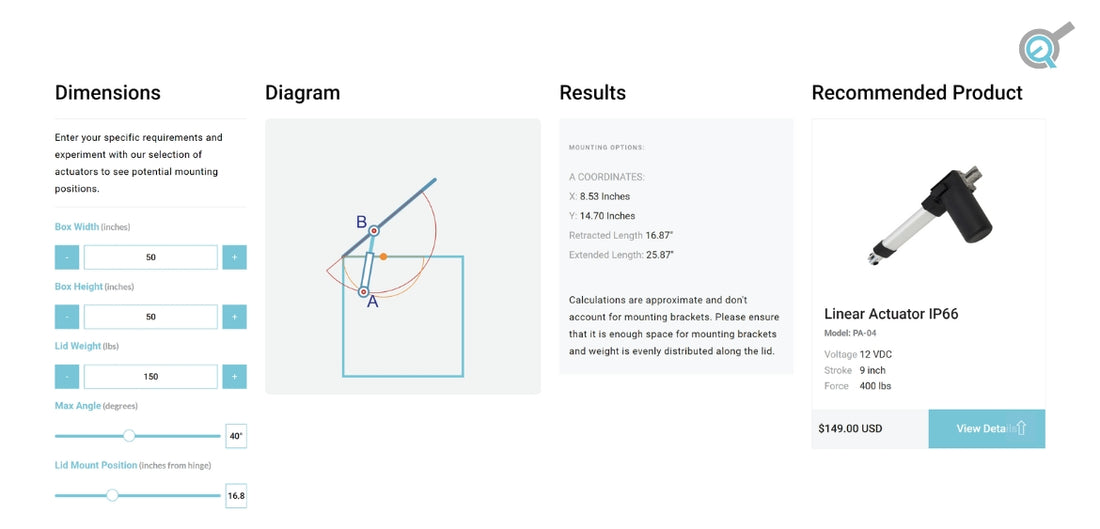
The first step to using our calculator tool is navigating our website for the link. At our home page, hover your mouse over the "Resources" tab and then click on "Linear Actuator Calculator" to open the page. This tool has a maximum width range of up to 100 inches and a maximum height range of up to 100 inches. It is the user's responsibility to perform physical tests and measurements for further verifications after using the calculator tool for making initial estimations and references. Something else to also note is that the "A" and "B" mounting points that will display when you choose an actuator model are to represent the mounting holes of your actuator(s). This tool does not account for any custom or standard mounting brackets that you may install in the finalized project.
Understanding the Physical Parameters

This tool will require the physical measurements of parameters such as the width, height, and weight of our trapdoor. The angle of how far the trapdoor will open is going to need some initial estimations. The mounting hole position for the shaft of our electric linear actuator(s) and the number of actuators we plan to use are factors that need to be predicted for simulation. By approximating the size, weight, and scale of the project, we can make predictions for what type of actuator can be used for simulation. Stroke length will be one of the variables that we keep adjusting until we find a suitable recommended product that pops up on the right side of the calculator tool.
Measuring Your Trapdoor

The next step is to measure the dimensions of the trapdoor project and find the weight of the door. For rough measurements, a measuring tape should be accurate enough. Weight for a trapdoor can be estimated by calculating its volume (in^3) and then multiplying it by the pound mass per cubic inch (lbs/in^3) value based on the materials it was made from.
Our demonstration uses an example wooden trapdoor with the following values:
Weight = 113 lbs
Length = 32 inch
Width = 37 inch
Height = 32 inch
Because most trapdoors have stairs or ladders going to the basement, there's usually not much limitation on height, however, we'll just use 32 inches to have a value that was the same as our length. The ideal angle of opening will depend on personal preference and user height; however, 75 degrees will be used for our example trapdoor.
Entering the Values

After you have measured the trapdoor, plug the necessary values into the calculator tool. By estimating the scale of your project, you can predict whether one actuator will be sufficient for the simulator or if using two actuators will be better for larger and heavier trapdoors. For just one actuator, we want to have the actuator mounted as close to the middle as we can to keep the weight as balanced as possible and reduce any chance of offset or side loading. This also helps to ensure the trapdoor can raise evenly instead of hanging or drooping due to a lack of support on the one side.
If you were to use 2 actuators, you'd have one on the left and one on the right for support and balance. When multiple actuators are required to travel synchronously, we recommend actuators with hall effect sensors. This is because they have hall effect feedback that goes to a control box which would then be able to make the needed corrections if one side travels at a different speed from the other. Differing speeds can sometimes happen from slightly unequal weight distribution or the speed tolerance from the DC motors (+/- 10%) in the actuators.
The PA-04-HS is the only standard actuator we sell with hall effect sensors from off the shelf, however, we're going to use one PA-04 actuator in this example and choose a 4-inch stroke length to start with. We'll find that the angle and the default mount position are not suitable, so we'll have to adjust those, or we'll need to choose a different actuator or stroke length.
Making Gradual Adjustments

To better visualize what variable changes have what effects, you may test out the simulator by making gradual adjustments to the variables that have flexibility. By lowering the opening angle to 24 degrees or lower, the previously chosen actuator will work, however, the result will be an uncomfortable angle to climb in and out of the basement. In this case, we will return the angle back to 75 degrees for a comfortable opening angle. By changing to longer stroke lengths via trial and error, we're able to find an 8-inch stroke that works, however, the actuator will be located very close to the wall in the X coordinate. Only having a 2-inch gap can be awkward for some installation conditions and does not leave as much room for play or adjustments if we want to take into account mounting brackets for the future.
Adjusting For More Space

Choosing a longer stroke length allows for more options to have a larger working room that can help account for extra space to add mounting brackets in the future. Different models of mounting brackets such as our BRK-01 and BRK-02 have different space requirements due to their dimensions. You may also fabricate your own custom mounting brackets if you prefer.
Leverage for Heavier Doors

If we find out that the weight of our door will become heavier than initially expected, this simulator can have the weight parameter adjusted. If you find the simulator with orange and red lines indicated but no actuator displayed, it could be because the chosen actuator does not have enough of a force rating for the door’s weight. In this example, the actuator disappears when there is a weight of 152 lbs because it doesn't have enough force capacity but will reappear when the weight is 151 lbs. Using a longer stroke length can allow for more leverage to handle more force. Doing so will cause the "B" mounting point to stay the same while the "A" mounting point moves backward. Using a 12-inch stoke allows for a door weight of up to 162 lbs while the 10-inch stroke could handle a maximum of 151 lbs.
For the full video of our calculator tool, feel free to check out our video below:
IN SUMMARY
Having a simulator and force calculator with angles is a helpful source of reference during the initial stages of a trapdoor project. By getting rough estimates and a general idea of which model actuator(s) can be considered with our calculator tool, you are now one step closer to automating your trapdoor!
We hope you found this as informative and interesting as we did, especially if you were looking for a calculator tool that will help you in choosing actuators for your trapdoor project! If you have any queries or wish to discuss our products further, please do not hesitate to reach out to us! We are experts in what we do and will be happy to assist in any way we can.
sales@progressiveautomations.com | 1-800-676-6123


