


Raising chickens at home is becoming more common and accepted for producing local fresh food. With that said, rearing chickens at home can be a lot more than just collecting the eggs. It does come with a set of responsibilities of ensuring they are well-fed, healthy; they have access to water, sunlight, ventilation and much more. But most of all, you need to be able to shut the chickens in and let them out of their coop daily, which does require a bit of time and effort.
In this article, our friend and creator of the Wall-E Robot, Mike Senna demonstrates his version of an automated chicken door opener. We will cover the details and products used in Mike’s project to gain a basic understanding on how you can make your very own simple automatic chicken coop door.
DIY Automatic Chicken Coop Door
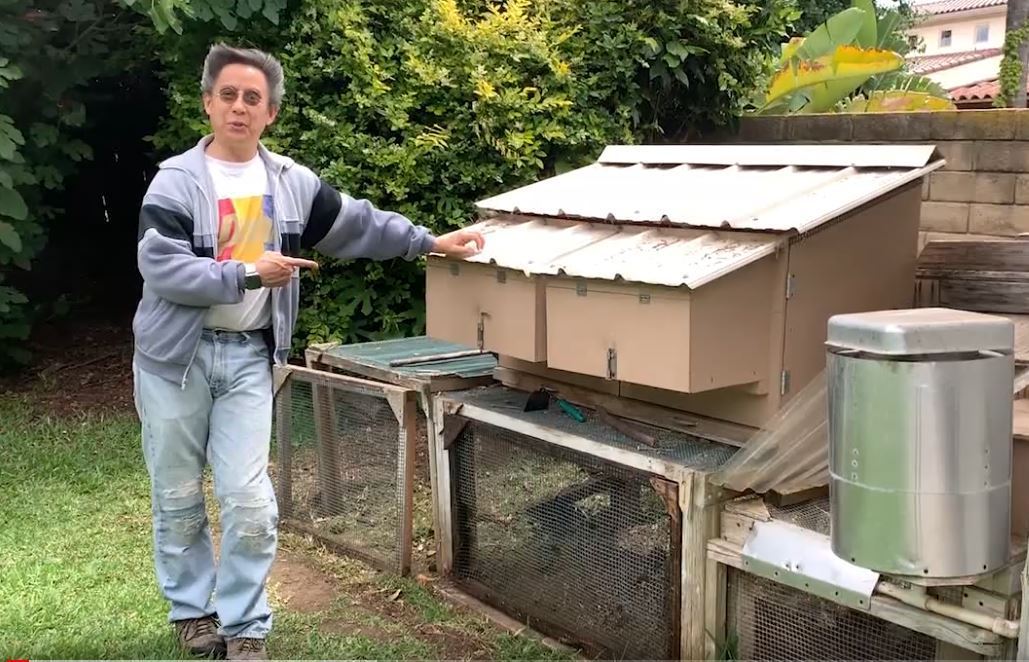
Mike’s original chicken coop came with a manual door that needed to be hand carried for opening and closing of the entrance. Although this was a working setup, it was inconvenient to carry the big bulky door everyday. The goal Mike had for his homemade automatic chicken coop door opener was to allow door movement via user control from anywhere in the world at anytime the user wanted. This automatic chicken door allows Mike to conveniently give the chickens an opportunity to roam freely during the day while offering sheltered protection during the dark after closing the door.
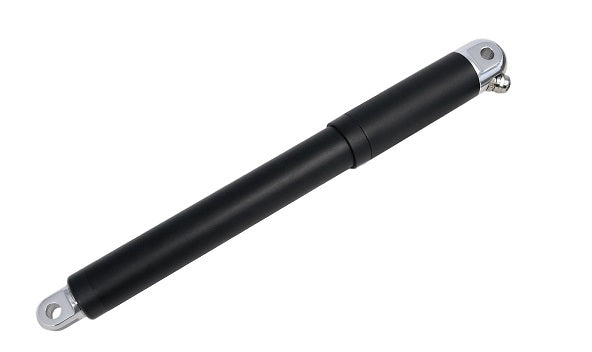
Selecting the Suitable Actuator
Mike wanted to build a chicken coop door that utilized a water protected solution since the application will be exposed to outdoor environments. Opening and closing the chicken coop’s door did not require much force so an electric actuator with high force ratings was not mandatory. The PA-06-6-180 actuator was selected for its high Ingress Protection rating of IP67M to ensure water protection even while moving.
Powering and Controlling the System
A power supply was now required to provide electrical power for an actuator and controller to run. The use of a 12 Volt Adapter allowed Mike to power his PA-06 actuator and the MHCOZY – Smart Switch Relay (2 Channel Wifi Inching Relay). Instructions for the MHCOZY – Smart Switch Relay came included with the purchase of the product. Using the MHCOZY – Smart Switch Relay enables Mike the ability to move the actuator by having control over the polarities from +12 VDC to -12 VDC to change travel directions.

Mike was also able to integrate Google’s home automation software with the MHCOZY –Smart Switch Relay to extend and retract the actuator through his smart phone. With the help of his new setup, Mike will soon be able to let his chickens roam free with the ease of a single voice command from the comfort of his own home. Not only that, but using Google’s free mobile app, he can open and close the door from anywhere in the world! The command to open the door is aptly named “Chicken.”

Roller Wheels for the Door
Screen rollers from Home Depot had the wheels that Mike was looking for. They were smooth and sturdy while still being compact in size. The wheels were unscrewed and removed from their rollers. Square tubing was then cut into shape to have these wheels installed. The square tubing also ensured the wheels will have very little play between the tracks that are later to be used in the build. Doing so will help prevent the wheels from being taken off by raccoons or coyotes once the roller wheels are attached to the door.

Installing the Door’s Framing
Wooden framing was then cut into shape and screwed onto the original manual door of the chicken coop. The framing will provide an area to secure the rest of the components that will be used to convert this manual door into an automatic door.

Attaching the Tracks
Mike used roofing gutters as a form of tracks for the sliding door to have a pre-defined travel path. The tracks were then attached securely with screws to the top and bottom wooden frame pieces.

Cutting and Welding the Door
A screen door grill was chosen to be the door’s material for its high durability and powder coated finish which prevents rusting. This door was cut into the desired shape and later welded to the roller wheels which had been previously assembled.

Putting the Door Together
The excess grill around the wooden framing is then cut and removed to make room for the sliding door on wheels. After this step, the remaining grill gets secured tightly with screws to the wooden framing since the finalized shape and size has been confirmed.

The door on wheels can now slide into its place on the top and bottom track pieces.

Installing a Mechanical Leverage with an Actuator

The final step to complete the automatic chicken door requires the PA-06 actuator with its circuitry to be installed to the mechanism that enables door movement. Mike uses some links to achieve mechanical leveraging which allows the door to open a full 18” using only a 6” stroke actuator. This was done by positioning the arm so that there would be 3.5 inches on one side of the pivot point and 10.5 inches (3.5 inches x 3) on the other side.
Now that the chicken door opener has been completed, we can watch the full video of it in action along with its build process!
Check out our webinar with guest speaker Mike Senna!:
In Summary
Mike and other DIY inventors are changing the way we view technology and how this technology can be used in our society. Perhaps with more innovations like Mike’s automatic chicken door opener, we will see a whole world filled with simple, yet brilliant, automated solutions.
Thank you to Mike for sharing your homemade automatic chicken coop door opener!
If you have any custom projects, applications, or technical questions on our products, feel free to reach out to us at sales@progressiveautomations.com or call 1-800-676-6123. We look forward to hearing from you!